Merlin/Medipix direct electron detector

Do not attempt to do anything you have not been trained to do by ePSIC staff.

Please do not attempt to change any settings on the Merlin/Medipix software other than those explicitly referred to in this page. Doing so may produce unexpected results!

4DSTEM data collection with metadata


There is a qt GUI on TEMCentre PC that enables Users trigger 4DSTEM data collection on Merlin detector, also capturing the state of the microscope in an hdf file.

The steps to set this up:

  1. Load an acquisition script in Merlin software- this is to set the bias and thresholds.
  2. On TEMCentre PC, start Spyder IDE interface and run the script to open the GUI
  3. Set the parameters on the GUI and when ready press Acquire. This would arm the detector, blank the beam and provide a second window instructing to lift the screen and retract OneView detector. Once that is clicked the data acquisition starts. The data (a mib file and a hdr file, both ending with _data) is saved in /dls/e02/data/year/session_visit/Merlin/timestamp. Note that this timestamp used for the folder is set by Merlin PC and may be different from the timestamp used for the data file names (those are set by TEMCentre PC clock). A metadata hdf file with the same timestamp as the data files is also saved in /dls/e02/data/year/session_visit/Merlin/


Here is the structure of an example metadata file:

{'experiment:NXentry': {'data:NXdata': {}},
 'metadata': {'A1_value_(kV)': 3.869999885559082,
  'A2_value_(kV)': 1.1100000143051147,
  'aperture_size': 1,
  'current_OLfine': 33673,
  'deflector_values': {'ANGBAL': array([32768, 32768], dtype=int32),
   'CLA1': array([15776,  8032], dtype=int32),
   'CLA2': array([31487, 29314], dtype=int32),
   'CLS': array([33245, 29480], dtype=int32),
   'Correction': array([44800, 44800], dtype=int32),
   'GUNA1': array([28329, 35414], dtype=int32),
   'GUNA2': array([31312, 34299], dtype=int32),
   'ILS': array([32768, 32768], dtype=int32),
   'IS1': array([32768, 32768], dtype=int32),
   'IS2': array([32768, 32768], dtype=int32),
   'MAGADJUST': array([10752, 10752], dtype=int32),
   'OFFSET': array([32768, 32768], dtype=int32),
   'OLS': array([32768, 32768], dtype=int32),
   'PLA': array([33332, 31092], dtype=int32),
   'ROTATION': array([32768, 32768], dtype=int32),
   'SCAN1': array([15776,  8032], dtype=int32),
   'SCAN2': array([31487, 29314], dtype=int32),
   'SHIFBAL': array([26944, 25792], dtype=int32),
   'SPOTA': array([30768, 38788], dtype=int32),
   'STEMIS': array([32189, 29485], dtype=int32),
   'TILTBAL': array([45056, 45056], dtype=int32)},
  'field_of_view(m)': 2.0000000000000002e-16,
  'ht_value(V)': 15000.0,
  'lens_values': {'CL1': 33536,
   'CL2': 0,
   'CL3': 29952,
   'CM': 33059,
   'IL1': 24576,
   'IL2': 12288,
   'IL3': 23631,
   'OLC': 44636,
   'OLF': 33673,
   'OLSF': 2048,
   'OM': 0,
   'PL1': 54016},
  'magnification': 1000000,
  'nominal_camera_length(m)': 0.04,
  'nominal_scan_rotation': 0,
  'spot_size': 6,
  'step_size(m)': 7.812500000000001e-19,
  'zero_OLfine': 33673}}


Conversion of mib to hdf5 (when metadata is collected)

If 4DSTEM data is collected using the GUI, follow the following steps to convert to hdf5:

  1. On NX linux platform browse to /dls_sw/e02/scripts/batch_mib_convert and start a terminal (right click in folder)
  2. Run the following command:
python batch_convert_cluster.py e02 <year> <session_ID>

This should start multiple cluster jobs, converting mib files into hdf5. The output appears in /dls/e02/data/year/session_ID/processing/Merlin.


Manual Data Acquisition

Setting up for live view.

Under Config Files, browse for the command file: Desktop\Command files\Live and press Run. In a few seconds live display should be active under Image (Start Acquisition button turns red and shows Stop Acquisition). Note that this script removes the File Saving option. The live image is set to a frame time of 10 msec with 6-bit counting depth. If any of these parameters require changing, stop the acquisition, apply the changes in the Image tab [**Frame Time and Counting Mode (depth) only to be changed**] and restart the acquisition.


Capturing a single frame (Internal trigger)

Using live mode, decide on the suitable frame time (minimum 1 msec, no practical maximum) and counting depth for your acquisition (1×2, 2×6, 2×12 or 24-bit). Note that only one of the two counters will be in use (Counter 0, except in 24-bit mode where they will be filled sequentially). Note that settings can only be changed while the acquisition is stopped.


To record a single frame:

  • Stop live view
  • Enter 1 for Number of Frames [Note: this is set to 0 for live imaging]
  • Select File Saving and Use Time Stamping, provide a file name and browse to the data folder corresponding to your visit (normally: DATA(D:)\em-VISIT_NUMBER)
  • Make sure that OneView is retracted, beam un-blanked and phosphor screen raised
  • Press Start Acquisition


Capturing a series of frames continuously (Internal trigger)

This mode of acquisition is suited for capturing a series of frames in TEM mode. In Continuous Mode, the two counters are read alternately with no gap time and written to disk.


  • Stop live view
  • Select the Continuous Mode
  • Select the counter depth (Only 1×2, 2×6, 2×12 options for counters are available for this mode)
  • Enter the number of continuous images you wish to capture in both Number of Frames and Number of Frames/Trigger. Note that if Number of Frames/Trigger is set to ‘1’ a series of non-continuous images will be recorded.
  • Enter the desired Frame Time [duration that the detector is capturing]. Note: It is recommended to operate with zero gap time between frames. In this case, the Frame Time needs to be greater than the read-out time of the detector counters (820 msec for 12-bit depth, 410 msec for 6-bit depth). If values less than the above times are set, the acquisition will revert to these hard lower limits.
  • Select File Saving and Use Time Stamping, provide a file name and browse to the data folder corresponding to your visit (normally: DATA(D:)\em-VISIT_NUMBER). Select Save All Images in Single File.
  • Make sure that OneView is retracted, beam un-blanked and phosphor screen raised

Press Start Acquisition


Capturing 4D-STEM datasets (external trigger)

In this mode, the acquisitions are triggered by the clock from the JEOL scan generator. Firstly, set up the live view, as described in (1), position the beam as required and select a suitable counting depth. The counting depth will determine the minimum dwell time in your STEM scan and the maximum size of your scan array (see Table 1).

    • In GMS, stop DigiScan View (make sure the Focus or Spot buttons are not selected). A STEM image should now be displayed in JEOL TEMCentre Scan Image Viewer (Full Scan / Search Mode is selected). In the TEMCentre Scan Image Viewer press Spot and then blank the beam (F1 on console).
    • In TEMCentre Scan Image Viewer edit the Free Mode parameters and set the dwell time and scan size:


Table 1- Acquisition conditions that have been tested

Counter bit depthFastest scan dwell time (μsec)Scan arraymib file size (GB)Running condition
6650512x51216.9headless
6500512x51216.8headless + RAW
65001024x1024

67.5

headless + RAW
121000512x51233.65headless
1210001024x1024134.6headless


4R acquisition conditions

note there is some variation run to run on the max frames, perhaps  +/- 5%

Counter bit depth

Scan dwell time (μsec)

Max Frames

Max Scan array

mib file size (GB)

Running condition

1

1000

>1M

1024 x 1024


headless + RAW

1

500

>1M

1024 x 1024


headless + RAW

1

250

>1M

1024 x 1024


headless + RAW

6

1000

331562

512 x 512


headless + RAW

6

800

110000

256 x 256


headless + RAW

6700>65536256 x 25616.4headless + RAW
665058920256 x 230
headless + RAW
660060245256 x 235
headless + RAW

6

500

6954

64 x 64


headless + RAW

12

3000

160163

256 x 256


headless + RAW

12

2000

85410

256x256


headless + RAW

12

1000

64705

256x252


headless + RAW


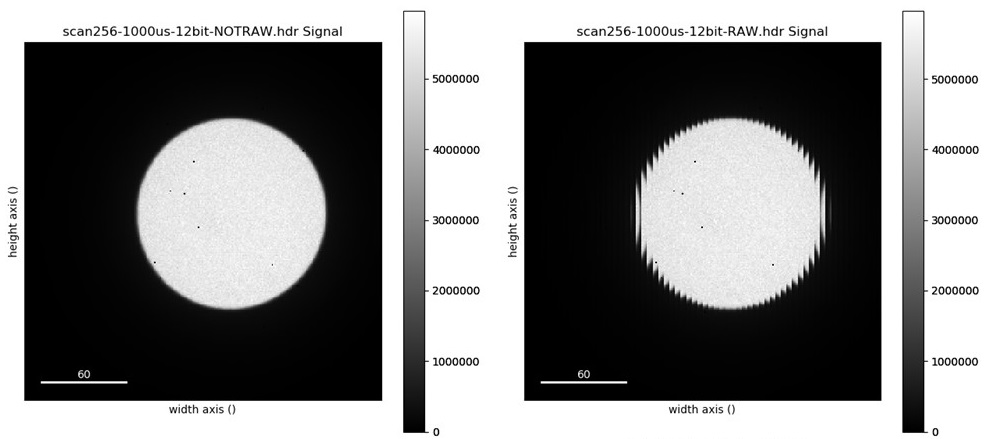
When you acquire data with RAW format selected, time-stamping DOES NOT work. If time-stamping is selected it would create the folder with date and time but will save the data in the parent folder. The data in this format requires re-arranging (see image below). Please seek help from ePSIC staff if you need to run in RAW format.


  • In Merlin, select File Saving and Use Time Stamping, provide a file name and browse to the data folder corresponding to your visit (normally: DATA(D:)\em-VISIT_NUMBER). Select Save All Images in Single File.
  • In Merlin, under Config Files, browse to the acquisition file corresponding to your chosen scan size and counter depth and press Run. After few seconds this will arm the detector (Stop Acquisition will show in the Image tab). Note: The Frame Time in Merlin will be set to around half the scan dwell time. This is as a de-bounce buffer to avoid unwanted acquisition trigger due to a noisy scan signal.
  • Make sure that OneView is retracted and phosphor screen raised. Note: If simultaneous ADF image is needed leave JEOL ADF1 inserted (This will cause a ring shadow at the edge of the Medipix image). Otherwise, retract ADF1 in TEMCenter using the STEM Detector IN/OUT controller.
  • To start acquisition, un-blank the beam and click on Free Mode in TEMCentre Scan Image Viewer. If collecting simultaneous ADF, click Record just after the scan starts. (This single ADF image saves in MyPictures)
  • The acquisition can be tracked both on Merlin and the TEMCentre Scan Image Viewer. Make sure that the total number of frames acquired matches the initial value.


Conversion of mib to hdf5 (when collected manually)

If 4DSTEM data is collected manually (from Merlin software), follow the following steps to convert to hdf5:

  1. On NX linux platform browse to /dls_sw/e02/scripts/old_conversion_working and start a terminal (right click in folder)
  2. Run the following command:
python batch_convert_cluster.py e02 <year> <session_ID>

This should start multiple cluster jobs, converting mib files into hdf5. The output appears in /dls/e02/data/year/session_ID/processing/Merlin.